
There are multiple options to choose an infrastructure and multiple ways to provision it. My first choice would be to use ansible playbooks with my servers at home but because customers come first and I wanted to be best positioned to help my customer I landed up using Terraform to provision my AWS account with the resources required to install openshift 3.6 on it.
At this point it would be noteworthy that the description below is for a single master, non HA deployment. That means there is no redundancy in my environment. If the master instance becomes unavailable my openshift environment is as good as a dead fish. This is the architecture I aimed for with my terrafterrafromorm scripts.
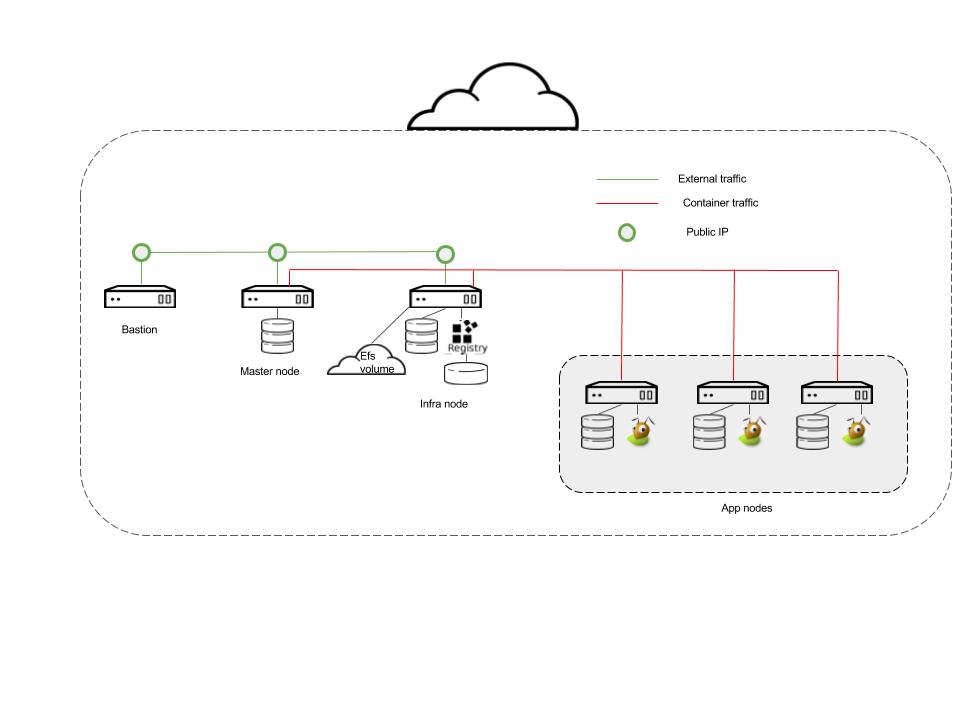
Salient features that need consideration from the architecture above are
- Bastion, Master and Infra nodes need to exist on the public VPC.
- All nodes, bastion, master, infra and app nodes exist on the private VPC
- The master and Infra nodes have 2 disks each, 1 disk is for the OS and the second for docker storage.
- S3 bucket provisioned for registry storage
- Each app node has 3 disks.
- Disk 1 – For the OS
- Disk 2 – Docker Storage
- Disk 3 – Gluster device 1
- Disk 4 – Gluster device 2
- 3 elastic IPs created and assigned 1 each to bastion, master and infra node
- EFS volume created for some openshift purposes.
A. Once you’ve determined what kind of storage you want to use for the various openshift pieces i.e.
Local docker storage -> Allocated disk
Registry -> S3
Logging-> AWS EFS
Monitoring -> AWS EFS
Applications -> Gluster CNS (so set aside 2 devices per app node)
B. You’ve followed the recommendations from the Red Hat on instance sizing by following this link Red Hat Openshift 3.6 System Requirements and this is the mapping of the node type and the min AWS instance type.
master node -> t2.xlarge
infra node -> t2.xlarge
app node -> t2.large
C. You are all set to use terraform to provision the AWS env. The github link here has the files required to spin up the environment. The things you’d need to take care of are:
keypairs.tf : This references admin-key so you should have that key created as per AWS requirements.
terrafrom.tfvars: Should have the aws keys specified for you
s3registry.tf: Replace the string “Insert name here” with your “bucket name”
infra.tf: Replace <domain> with your owned name. Eg for my environment the domain I own is rukh.org so I have <domain> replaced with “rukh”.
Once you have the files modified you are ready to install and run terraform.
Any tutorial on youtube on terraform will tell you to install and run terrafrom. In my references I have a link to the terrafrom tutorial I referred to.
So continuing with the provisioning.
After you run with the a
terraform apply
You should have all the components from the figure set up and ready to proceed with the next stage of actually installing openshift (Upcoming Part 2)
References
